When deciding between DMX512 and SPI addressable LED Tapes for your project, understanding the nuances of each protocol is essential. Both offer unique advantages, but their differences could significantly impact the execution and performance of your lighting designs.
DMX512 is revered for its robustness and ability to handle complex lighting setups over long distances without signal loss. This makes it a staple in professional environments where reliability is paramount. It’s designed for real-time control, capable of managing large installations with many fixtures and lights, including addressable LED Tapes.
SPI, on the other hand, is celebrated for its simplicity and flexibility, especially in smaller projects or where the user has more direct control over the programming. It’s a favorite among hobbyists and those working on custom installations because it easily interfaces with popular DIY electronics platforms.
To further clarify their differences, here’s a comparison in table format:
| Feature | DMX512 Addressable LED Tape | SPI Addressable LED Tape |
| Control Protocol | Standardized for lighting industry | Simple serial interface |
| Signal Type | Differential signaling for robustness | Single-ended, more susceptible to noise |
| Distance | Suitable for long-distance installations | Best for shorter distances |
| Complexity | Requires DMX controller and potentially more complex setup | Simpler to set up with common microcontrollers |
| Applications | Professional stage, architectural lighting | DIY projects, home decoration |
| Cost | Higher due to professional-grade equipment | Generally more affordable |
Choosing between DMX512 and SPI should be based on the project’s scale, the environment in which the LED Tapes will be used, and the user’s technical expertise. DMX512 is the go-to for professional, large-scale installations requiring high reliability. In contrast, SPI offers a more accessible and flexible option for those experimenting with custom lighting projects or working on a smaller scale.
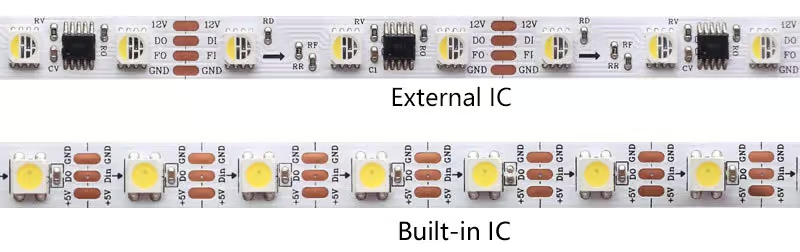
Built-in IC vs. External IC
In the realm of addressable LED Tapes, the distinction between built-in ICs (Integrated Circuits) and external ICs is crucial for understanding how each LED is controlled and the overall design of the strip. This choice impacts not only the installation process but also the strip’s flexibility and how well it can be integrated into various projects.
Built-in IC LED Tapes have the controlling circuit integrated within the LED package itself. This design simplifies the strip’s appearance and can make installation easier, as there are fewer components to manage. The compact nature of built-in IC strips often results in a cleaner look, ideal for visible installations where aesthetics are important. However, this integration can sometimes limit repairability; if an LED or its IC fails, the affected section may need to be replaced entirely.
External IC LED Tapes, conversely, feature separate control chips located along the strip, not within the LED packages. This configuration can offer more flexibility in terms of repair and customization, as individual components can be more easily replaced or modified. While external ICs might make the strip bulkier or more complex to install, they often allow for more robust troubleshooting and are preferred in applications where long-term maintenance and serviceability are concerns.
To compare these options more directly, let’s look at them in a table format:
| Feature | Built-in IC LED Tapes | External IC LED Tapes |
| Aesthetics | Sleeker, more integrated design | Potentially bulkier due to separate ICs |
| Installation | Generally simpler, fewer components | Might be more complex, but allows for customization |
| Repairability | Less flexible, may require replacing larger sections | More serviceable, individual components can be replaced |
| Application | Ideal for decorative purposes where appearance is key | Suited for professional or long-term projects requiring maintenance |
Whether you choose built-in or external ICs for your addressable LED Tape project will depend on your priorities: the ease of installation and aesthetics or the flexibility and maintainability of the lighting system. Each type has its advantages, and the best choice varies based on the specific needs and constraints of your project.
What is Pixel of Addressable LED Tape?
When delving into the world of addressable LED Tapes, the term “pixel” frequently comes up, but what exactly does it mean in this context? Understanding the pixel composition of these strips is crucial for anyone looking to create detailed and dynamic lighting effects.
Pixel Definition
In the realm of addressable LED Tapes, a “pixel” refers to the smallest controllable element of the strip. This can vary based on the voltage and design of the strip. Generally, for 5V strips, one LED constitutes a single pixel, offering individual control over that LED’s color and brightness. At 12V, a pixel can either be one LED or consist of three LEDs grouped together as a single controllable unit. Meanwhile, 24V strips often have six LEDs per pixel, further impacting control granularity and power distribution.
Calculating the Length of an Addressable LED Tape Connected to a Controller
DMX512 Addressable LED Tape
For DMX512 controllers, which are designed to handle 512 channel addresses per universe, calculating the maximum length of an addressable LED Tape it can control requires a few steps. First, determine whether the strip is RGB or RGBW since an RGB pixel uses three channel addresses, while an RGBW pixel uses four. Next, identify the number of pixels per meter on the strip. Multiplying the number of pixels by the channel addresses per pixel gives you the total channel addresses per meter. Dividing 512 by this number yields the maximum length of strip a single universe can control.
Example: For a 5050, 60LEDs/m, RGBW DMX512 addressable LED Tape with 24V and 10 pixels per meter, the calculation would be as follows:
- Each RGBW pixel uses 4 channel addresses.
- With 10 pixels per meter, that’s 40 channel addresses per meter.
- Therefore, a single DMX512 universe (512 channels) can control up to ( \frac{512}{40} = 12.8 ) meters of this LED Tape.
SPI Addressable LED Tape
The calculation for SPI addressable LED Tapes is more straightforward. Simply check the maximum number of pixels your controller supports, then divide this by the number of pixels per meter on your LED Tape to find out the maximum strip length it can manage.
Example: If an SPI controller supports up to 1024 pixels, and the strip has 60 pixels per meter, the maximum length the controller can handle is ( \frac{1024}{60} \approx 17 ) meters.
Understanding these calculations is essential for anyone planning to incorporate addressable LED Tapes into their projects, ensuring compatibility and functionality between the strips and their controllers.
What is PWM Frequency of IC?
PWM (Pulse Width Modulation) frequency of an Integrated Circuit (IC) refers to the rate at which the IC can turn its output on and off to control the brightness of LEDs or the speed of a motor. The frequency is measured in Hertz (Hz), indicating the number of cycles per second. A higher PWM frequency is particularly important in lighting applications, such as with addressable LED Tapes, because it reduces the likelihood of flicker that can be detected by the human eye or captured by video recorders. When the PWM frequency is high enough, the on-off cycling of the LEDs happens so rapidly that the visual persistence of the human eye perceives it as a continuous light source without flicker. This is crucial not only for creating stable and comfortable lighting environments but also for ensuring that video recordings in the vicinity of these lights do not capture distracting or unprofessional-looking flicker effects. Therefore, choosing ICs with a higher PWM frequency is essential for applications requiring smooth dimming or color changing effects and for avoiding flicker in photography and videography.
Maximum Distance of Signal Transmission
When implementing lighting systems, understanding the maximum distance of signal transmission is crucial for ensuring reliable communication between the controller and the LED Tapes. This factor significantly impacts the design and feasibility of large-scale installations.
The Maximum Transmission Distance of DMX512 Signal
The DMX512 protocol, celebrated for its robustness and reliability in professional lighting applications, allows for a considerable maximum signal transmission distance. Typically, a DMX512 signal can be transmitted up to 300 meters (approximately 984 feet) under optimal conditions, utilizing proper cabling (such as 120-ohm, low-capacitance, twisted-pair cable). This capability renders DMX512 suitable for a wide array of applications, including large venues, outdoor events, and architectural lighting projects that necessitate significant distances between the controller and LED fixtures. Maintaining signal integrity over such distances necessitates the use of high-quality cables and connectors.
The Maximum Transmission Distance of SPI Signal
Conversely, the SPI (Serial Peripheral Interface) signal, preferred for its simplicity and ease of use in DIY projects and smaller installations, supports a generally shorter maximum transmission distance. For most SPI-based LED Tapes, the maximum reliable transmission distance typically refers to the distance between two ICs or between the LED Tape and the controller. This distance is generally around 10 meters (approximately 33 feet). However, a unique feature of SPI LED Tapes is that when an IC receives a signal, it not only controls the color change of the LED but also amplifies the signal before passing it on to the next IC. This means that the actual maximum transmission distance can extend significantly beyond 10 meters, as the signal is effectively regenerated at each IC along the strip, allowing for longer runs without loss of signal integrity.
Understanding the specifics of signal transmission distance is essential for planning and implementing lighting projects, ensuring that the selected control protocol meets the project’s scale and layout requirements effectively.
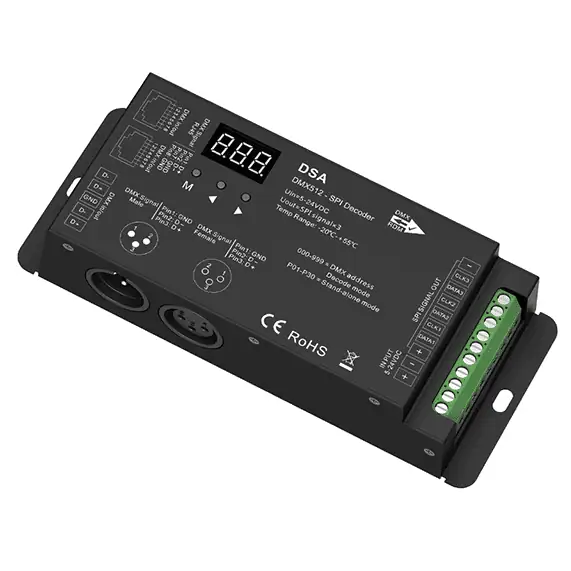
Can I Connect SPI Addressable LED Tape to DMX512 Controller?
Yes, connecting an SPI addressable LED Tape to a DMX512 controller is indeed possible, but it requires an intermediary device known as a DMX512 to SPI decoder. This setup involves first connecting your SPI addressable LED Tape to the DMX512 to SPI decoder. Then, this decoder is connected to the DMX controller. The decoder acts as a bridge between the two different protocols, translating DMX512 signals into SPI commands that the LED Tape can understand. This allows for seamless integration of SPI addressable LED Tapes into lighting systems originally designed for DMX512 control, expanding the possibilities for creative lighting projects that utilize the specific advantages of both systems.
Power Injection of Addressable LED Tape
Power injection is a critical technique used in the installation of addressable LED Tapes, especially for longer runs where voltage drop can be a significant issue. Voltage drop occurs as electrical current travels along the length of an LED Tape, resulting in the LEDs at the far end appearing dimmer than those closer to the power source. To counteract this effect and ensure uniform brightness across the entire length of the strip, power injection involves supplying power directly to multiple points along the strip, rather than solely at one end.
This process requires connecting additional power wires from the power supply to various points on the LED Tape, effectively ‘injecting’ power where it starts to wane. The exact intervals at which power should be injected depend on several factors, including the voltage of the strip (5V, 12V, or 24V), the type of LEDs, and the total length of the installation. As a general rule, injecting power every 5 to 10 meters (approximately 16 to 33 feet) is recommended to maintain consistent lighting.
It’s essential to ensure that the power supply used for injection has the capacity to handle the total load of the LED Tape and that all connections are made securely to prevent electrical shorts. Additionally, matching the voltage of the power supply with that of the LED Tape and ensuring polarity is consistent across all injection points are crucial for the safe and effective operation of the lighting system.
Power injection not only enhances the visual quality of LED installations by providing uniform brightness but also extends the lifespan of the LEDs by preventing overloading and overheating issues. Properly implemented, power injection can significantly improve the performance and appearance of addressable LED Tapes in both small and large-scale projects.
Post time: Aug-08-2024